

Introduction
In preparation for me to create a tutorial series around Pega Constellation, I ran into interesting issues when creating my properties and attempting to implement them on the UI. Considering that I’ve also seen plenty of Pega Community articles surrounding the topic, I figured why not create a quick tutorial.
If you’re anything like me, you’ve been developing within Pega UI Kit or Theme-Cosmos utilizing the Traditional UI Toolkit. The problem is that depending on the method in which you create the properties in a Pega Constellation instance, said property may not be available for you to add on your View.
Remember that within Pega Constellation, Pega is making a big push to utilize the View Configuration rather than the Section editor that older Pega Developers are accustomed to.
Quick Solution
In case you are just hungry for a quick solution, here are the steps below.
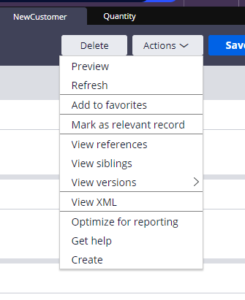
- Open your property
- Click on the Actions menu
- Select “Mark as a Relevant Record” if it isn’t grayed out
- (You may need to close and reopen your Case/View Designers in order to see the changes come through)
At which point you should be able to open your Data Designer and see the property within the list of Fields you can use within a View.
Boom, go try it out.
If you want a more detailed explanation on why this solution works. Keep reading.
I’m going to continue to dive deeper into what’s going on behind the scenes.
Note that for this tutorial I’m developing a Case Type that will track a customer’s order.
Detailed Explanation
Let’s create four properties using four different methods within Pega. I expect everybody experienced with Pega who is reading this blog post to be familiar with these methods, if so feel free to skim. The following is being added in for the sake of brevity.
For the first two properties let’s use the App Studio methods.
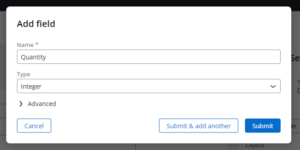
First Method: For CreateOrder we can simply create it utilizing the Data Model Designer by clicking the button “Add Field”
Second Method: For Quantity we’ll just use the View method that you see within plenty of Pega Academy articles.
These first two methods of creating properties have interesting implications going on behind the scenes that developers should keep in mind.
- The property is automatically optimized for you. Adding it to the table for that object.
- The property is automatically marked as relevant. This is why it shows up within View.
Now for the next two methods, let’s use some Dev Studio methods.
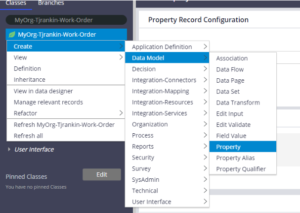
First Method: For OrderTotal we’ll create it within the usual Create> Data Model > Property.
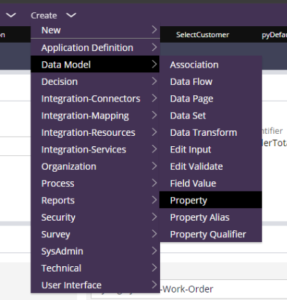
Second Method: And then for the last one we’ll simply utilize the App Explorer to create a NewCustomer boolean value.
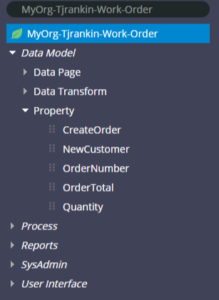
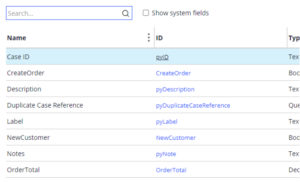
This is what my App Explorer looks like.
If you look at these last two properties you’ll be find exact opposite as what we created using the App Studio methods that Pega normally wants you to utilize.
- Pega doesn’t optimize the property nors adds it to the related table.
- The property is also not stamped as a relevant record.
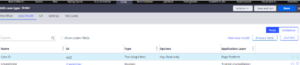
The last point is the main reason why we can’t see the property and add it within our View. (See screenshot below)
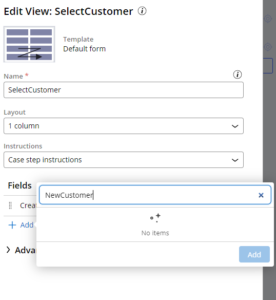
As you can see, even though I clearly added the property to the data model. It is unavailable for me to add to a View unless I mark it as relevant.
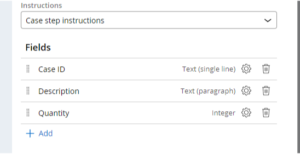
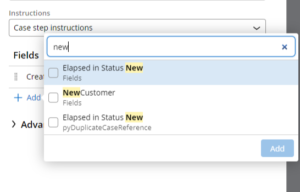
As soon as you mark the property as a relevant record you should now see it under your data model within the Data Designer.
And subsequently, you should be able to find and add it under your View Editor.
Takeaway/Discussion
Other than a simple solution to display your property within your View, the Dev Studio approaches give developers better control on the behaviors of their properties.
Because what if you don’t want to add a property to a table?
You can still add it to your UI and let users put values within the property storing the value within the Blob. Or the opposite is true, maybe you’d want to have a system property that can only be edited in Data Transforms and/or Activities but not be available for anybody to just slap on the UI. Then you could expose that property on a table from the BLOB.
App Studio offers developers a quicker way to fulfill business requirements, but as developers it’s important to keep in mind what is going on behind the scenes of the shortcuts App studio offers. Knowing even the tiniest technical parts of Pega will help developers maintain a healthy Pega instance.